Automated Mail Client Configuration with email-autoconf
How nice would it be, if every email client could be auto-configured and the user would just need to enter his credentials? Entering his email address plus password, hit enter, done. How come nowadays people still need to care about incoming IMAP and outgoing SMTP servers, encryption (SSL/TLS vs. STARTTLS protocols), ports (for a regular end user this is just a number without any meaning, right?), and maybe even wondering what was the username if that differs from the actual email address?
You may tell me: Hey, we're in 2021, email is so old-school! Or you may tell me: Oh, don't you know there is a thing called auto-configuration? – Unfortunately, both statements are wrong. Email today is still widely used for serious communication (and yes, you're right, it should have been replaced long time ago by something better! But it didn't.), and there is such a thing called auto-configuration, but there is just no real standardized protocol that works for every mail client out there. There was no real development in that field during the last 10+ years, sadly.
So, let me present that small Python project Martin and I have been developing for Onlime GmbH back in Feb 2020 and which I have now finally published on GitLab.com: onlime/email-autoconf
History: automx vs. email-autoconf
For years, I have been using automx (version 1) by the German Sys4 AG to serve our customers with auto-configuration for common mail clients. But that project was a pain, as it was badly maintained and was still based on ancient Python 2 at that time. It was not available as Debian package, and it required some patching to get it working as expected. Finally, back in Dec 2019, Sys4 has published a completely new version automx2 which was actually a full rewrite and had pretty much nothing in common with the previous product.
We tried to get automx2 running for our environment with the simple requirement of doing database (MySQL) based lookups of email-to-username mappings, as some legacy customers of Onlime GmbH still have email accounts where the username does not match the actual email address. That thing was so easy to configure in automx(1) but got a real pain in automx2 – It even looked like they have just forgotten about it. Overall, automx2 was so over-engineered and hard to install that it did not make our lives any easier. So, we just decided to write our own auto-configuration tool from scratch.
Please don't take me wrong. automx2 seems to have matured in the meantime, is much better documented, and may be easy to deploy. I didn't re-evaluate it since then, as we just didn't need it anymore.
And before you're getting too excited...
Deployment of email-autoconf currently is not that straight-forwarded yet, as up to now we were just using it for our mail services at Onlime and it has just been published (2021-08-26). This is fresh stuff, even though running absolutely wonderful (no single hang-up or performance issue!) since early 2020. I plan to publish an Ansible Galaxy role soon to make deployment easier.
Requirements
Requirements for email-autoconf were quite simple. It should support the following 3 protocols out of the box:
- Mozilla Autoconfig (Thunderbird)
- Microsoft Autodiscover (Outlook)
- Apple Mobileconfig (Apple Mail, iOS)
(... in the order of my preference. Why couldn't they all just adapt Mozilla's protocol which is super-duper simple?!)
It should also support the following:
- Option to run it without a database backend
- Option with a database backend in which it can lookup usernames and display names
- Let it run in the following flavors: Standalone on standard HTTPS/443 port, or with a reverse proxy (Apache/Nginx) in front, running on an internal port or socket, while the SSL-cert is served by the proxy.
- Easy and flexible to configure
- Serving high loads, providing great performance
We chose Flask as Python 3 microframework running on uWSGI as application server. You could use any other application server like Gunicorn, but uWSGI is the only one that has been tested and documented by us.
Installation
NOTE: In below result examples, we use
example.orgas company infrastructure domain where you run email-autoconf, andexample.comas customer domain which is hosted by you.
First, install some required packages, e.g. on Debian Linux:
# Python3 packages for venv
$ apt install python3-venv python3-pip python3-dev
# uWSGI requirements
$ apt install libssl-dev libpcre3-dev
Clone the repo, set up venv, and install required Python modules:
$ git clone https://gitlab.com/onlime/email-autoconf.git
$ cd email-autoconf
$ python3 -m venv venv
$ . venv/bin/activate
$ pip install -r requirements.txt
Copy the example config from instance/settings.py_example to instance/settings.py and edit it to match your needs:
DB_TYPE = 'mysql'
DB_HOST = '127.0.0.1'
DB_PORT = '3306'
DB_NAME = 'email-autoconf'
DB_USER = 'email-autoconf'
DB_PASSWORD = '************'

SELECT_USERNAME = "SELECT `dest` FROM `mailmap` WHERE `address` = '%a'"
SELECT_DISPLAY_NAME = "SELECT `display_name` FROM `mailaccounts` WHERE `username` = '%u'"

IMAP_SERVER_HOSTNAME = 'imap.example.org'
POP3_SERVER_HOSTNAME = 'pop.example.org'
SMTP_SERVER_HOSTNAME = 'smtp.example.org'

EMAIL_PROVIDER = 'example.org'
For all possible options, consult Configuration section below.
Set
DB_TYPE = 'none'if you don't need any specific email-to-username lookups. This works in an environment where every mail account uses its email address as username.
Now choose one of the 3 available uWSGI instance configurations:
uwsgi-http-instance.yml_example: Testing instance / HTTP port 8080uwsgi-https-instance.yml_example: HTTPS port 8443uwsgi-socket-instance.yml_example: Socket port 3032
Use those configurations as examples and deploy the one that fits your need. We recommend running it as a socket on port 3032 with uwsgi-socket-instance.yml instance config and set up an Apache/Nginx reverse proxy (see "Reverse Proxy" section below) in front of it for proper HTTPS support and optimal performance.
For testing, copy uwsgi-http-instance.yml_example to uwsgi-http-instance.yml and run the instance using uWSGI as application server:
$ uwsgi --yaml uwsgi-http.yml --yaml uwsgi-http-instance.yml
For basic testing, use curl e.g. to retrieve the autoconfig Mozilla scheme:
curl localhost:8080/mail/config-v1.1.xml?emailaddress=demo@example.com
For in-depth testing, use the provided scripts/email_autoconf_test.py, see Testing section below.
Configuration
It is possible to configure email-autoconf within the file instance/settings.py or with environment variables. See instance/settings.py_example for an example configuration.
Environment variables could be handed over if you add them in front of the uwsgi command, like this:
$ SMTP_SERVER=smtp.example.org uwsgi --yaml uwsgi-http.yml --yaml uwsgi-http-instance.yml
Settings for the uWSGI instance could be done in a .yml file which you then use in the start command. We recommend consulting the documentation on Configuring uWSGI for more details about the uWSGI configuration.
For a full list of config parameters, consult: documentation.md
Systemd Service
We recommend running email-autoconf as a Systemd service. The following setup has been proved working on a Debian Linux (tested on Debian 10 Buster).
IMPORTANT: Don’t run as
root!If you use a port number greater than 1024 (I suggest port 3032), the application does not require super user privileges when running. It also does not need to be installed as root. It is recommended that you create a user account specifically for email-autoconf, but other unprivileged users will do as well.
Create /etc/systemd/system/email-autoconf.service:
[Unit]
Description=uWSGI instance to serve email-autoconf
After=network.target

[Service]
Type=simple
User=email-autoconf
Group=email-autoconf
WorkingDirectory=/var/www/email-autoconf
ExecStart=/var/www/email-autoconf/venv/bin/uwsgi --yaml uwsgi-http.yml --yaml uwsgi-socket-instance.yml
Restart=on-failure

[Install]
WantedBy=multi-user.target
After creating this new Systemd service unit, run:
$ systemctl daemon-reload
Then, enable/start the service:
$ systemctl enable email-autoconf.service
$ systemctl start email-autoconf.service
$ systemctl status email-autoconf.service
email-autoconf should now in socket mode on port 3032 (as we have provideduwsgi-socket-instance.yml instance config in Systemd ExecStart command).
DNS Configuration
On your company's infrastructure DNS zone (the domain you usually put into EMAIL_PROVIDER in your instance config), you should configure the following DNS resource records:
email-autoconf  IN  A   X.X.X.X. ; IP of the server running email-autoconf

maildiscovery   IN  CNAME   email-autoconf.example.org.
autoconfig  IN  CNAME   maildiscovery.example.org.
autodiscover    IN  CNAME   maildiscovery.example.org.
On any customer domain, the following records should be configured:
autoconfig  300 IN  CNAME   maildiscovery.example.org.
_autodiscover._tcp  300 IN  SRV 0 0 443 maildiscovery.example.org.
Reverse Proxy
To simplify SSL handling and protect the uWSGI server, we strongly recommend using some sort of reverse proxy in front of email-autoconf. Below you can find config examples for Apache and Nginx.
NOTE: Below examples are based on the recommended
uwsgi-socket-instance.ymluWSGI instance configuration for email-autoconf, running it as a socket on port 3032.
Apache
In Apache, the modules proxy and proxy_uwsgi has to be enabled, while proxy should already be enabled by default.
$ a2enmod proxy_uwsgi
$ systemctl restart apache2
Apache vitual hosts to proxy requests to the email-autoconf uWSGI server could look like this:
<VirtualHost *:80>
    ServerName autoconfig.example.org
    ServerAlias autoconfig.*
    ServerAlias maildiscovery.example.org maildiscovery.*
    ServerAlias autodiscover.example.org autodiscover.*
    ErrorLog ${APACHE_LOG_DIR}/email_autoconf_error.log
    CustomLog ${APACHE_LOG_DIR}/email_autoconf_access.log combined
    ServerAdmin hostmaster@example.org

    ProxyPass / uwsgi://127.0.0.1:3032/
</VirtualHost>

<VirtualHost *:443>
    ServerName autoconfig.example.org
    ServerAlias autoconfig.*
    ServerAlias maildiscovery.example.org maildiscovery.*
    ServerAlias autodiscover.example.org autodiscover.*
    SSLEngine on
    SSLCertificateKeyFile /etc/letsencrypt/live/maildiscovery.example.org/privkey.pem
    SSLCertificateFile /etc/letsencrypt/live/maildiscovery.example.org/fullchain.pem
    ErrorLog ${APACHE_LOG_DIR}/email_autoconf_error.log
    CustomLog ${APACHE_LOG_DIR}/email_autoconf_access.log combined
    ServerAdmin hostmaster@example.com

    ProxyPass / uwsgi://127.0.0.1:3032/
</VirtualHost>
Nginx
For Nginx a config like this should work:
server {
    listen 80;
    server_name autoconfig.example.org autoconfig.* maildiscovery.* autodiscovery.* autodiscover.*;
    location / {
        proxy_pass http://127.0.0.1:3032/;
    }
}

server {
    listen 443 ssl;
    server_name autoconfig.example.org autoconfig.* maildiscovery.* autodiscovery.* autodiscover.*;
    ssl_certificate_key /etc/letsencrypt/live/maildiscovery.example.org/privkey.pem;
    ssl_certificate /etc/letsencrypt/live/maildiscovery.example.org/fullchain.pem;
    ssl_protocols TLSv1.2 TLSv1.3;
    location / {
        proxy_pass http://127.0.0.1:3032/;
    }
}
Check if email-autoconf is running (presents a nice splash screen with Onlime logo): https://maildiscovery.example.org/
Testing
email_autoconf_test.py
Use scripts/email_autoconf_test.py helper script to test any self-hosted or external email address. Make sure you execute that script under your venv which is correctly set up as described in above installation section:
$ cd /var/www/email-autoconf
$ . venv/bin/activate
(venv)$ cd scripts
(venv)$ python3 email_autoconf_test.py demo@example.com
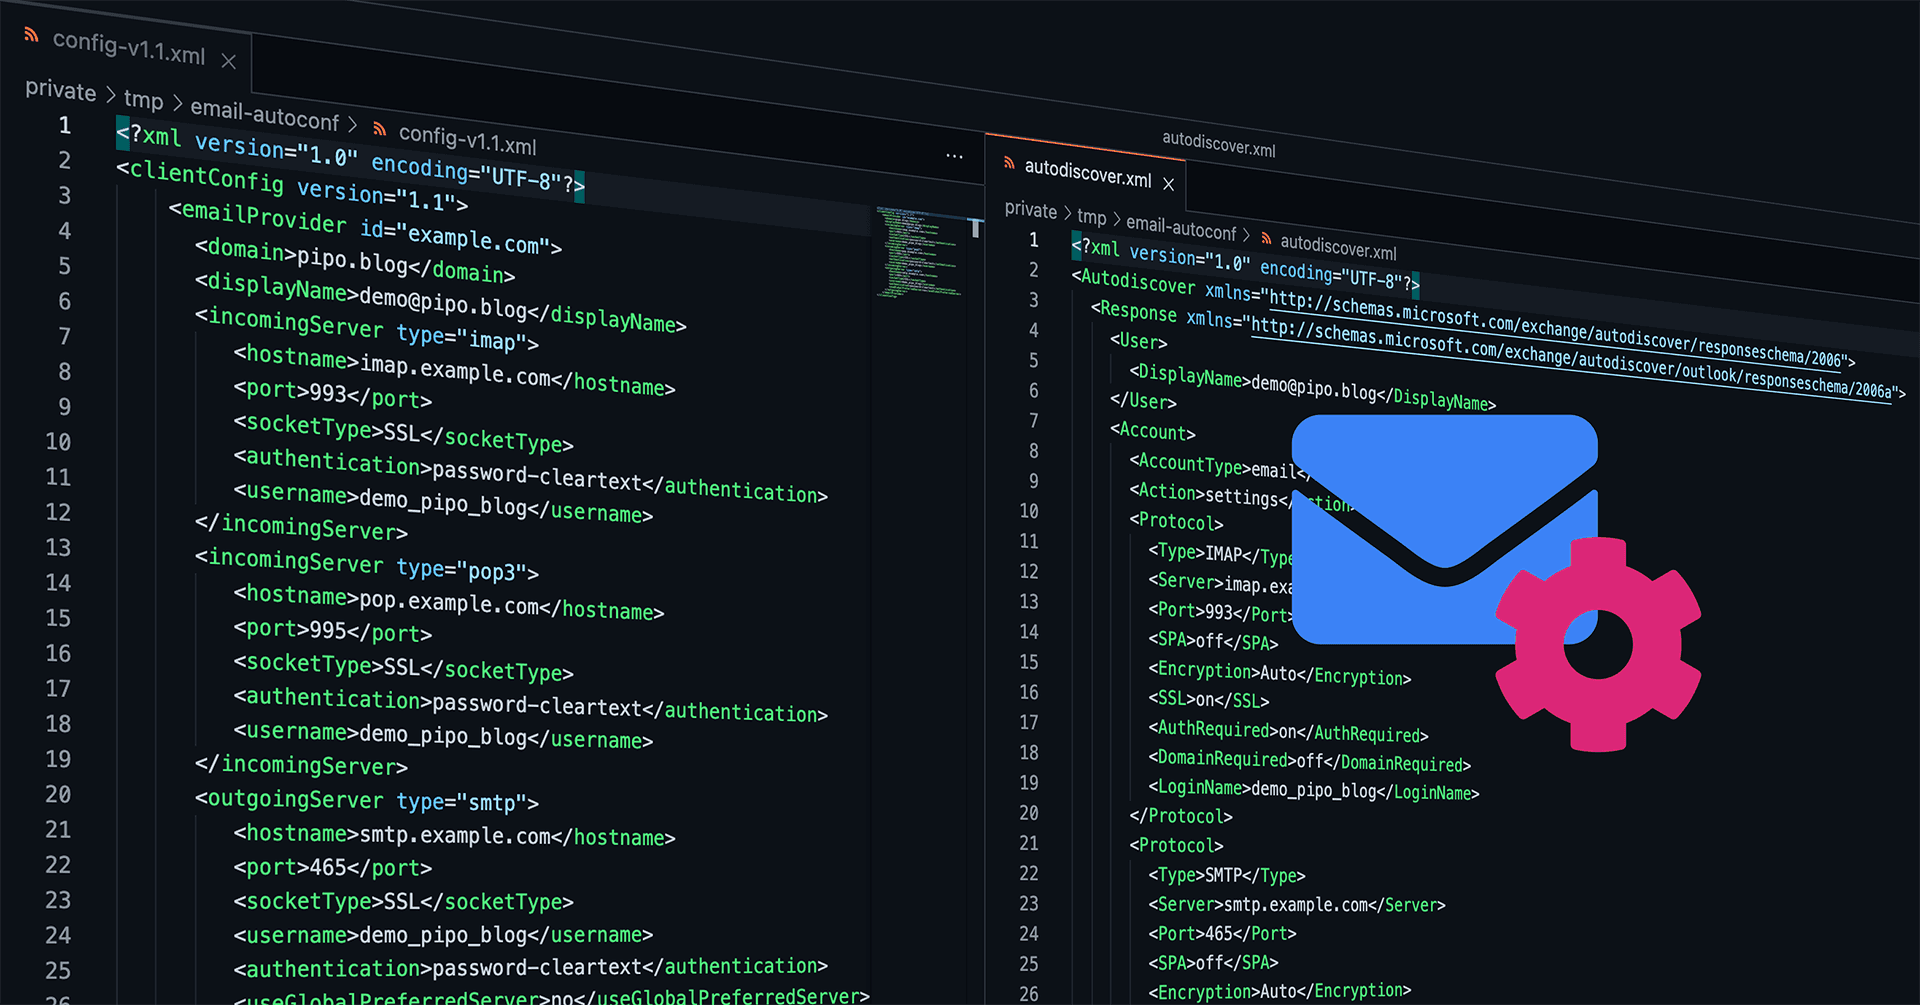
Sample result (full XML output for all 3 protocols Mozilla Autoconfig, Microsoft Autodiscover, Apple Mobileconfig):
Testing Autoconfig
Try https://autoconfig.example.org/mail/config-v1.1.xml?emailaddress=demo@example.com
Autoconfig content:

<?xml version="1.0" encoding="UTF-8"?>
<clientConfig version="1.1">
    <emailProvider id="example.org">
      <domain>example.com</domain>
      <displayName>demo@example.com</displayName>
      <incomingServer type="imap">
         <hostname>imap.example.org</hostname>
         <port>993</port>
         <socketType>SSL</socketType>
         <authentication>password-cleartext</authentication>
         <username>demo_example_com</username>
      </incomingServer>
      <incomingServer type="pop3">
         <hostname>pop.example.org</hostname>
         <port>995</port>
         <socketType>SSL</socketType>
         <authentication>password-cleartext</authentication>
         <username>demo_example_com</username>
      </incomingServer>
      <outgoingServer type="smtp">
         <hostname>smtp.example.org</hostname>
         <port>465</port>
         <socketType>SSL</socketType>
         <username>demo_example_com</username>
         <authentication>password-cleartext</authentication>
         <useGlobalPreferredServer>no</useGlobalPreferredServer>
      </outgoingServer>
    </emailProvider>
</clientConfig>

---
Testing Autodiscover
Try https://maildiscovery.example.org/autodiscover/autodiscover.xml
Autodiscover content:

<?xml version="1.0" encoding="UTF-8"?>
<Autodiscover xmlns="http://schemas.microsoft.com/exchange/autodiscover/responseschema/2006">
  <Response xmlns="http://schemas.microsoft.com/exchange/autodiscover/outlook/responseschema/2006a">
    <User>
      <DisplayName>demo@example.com</DisplayName>
    </User>
    <Account>
      <AccountType>email</AccountType>
      <Action>settings</Action>
      <Protocol>
        <Type>IMAP</Type>
        <Server>imap.example.org</Server>
        <Port>993</Port>
        <SPA>off</SPA>
        <Encryption>Auto</Encryption>
        <SSL>on</SSL>
        <AuthRequired>on</AuthRequired>
        <DomainRequired>off</DomainRequired>
        <LoginName>demo_example_com</LoginName>
      </Protocol>
      <Protocol>
        <Type>POP3</Type>
        <Server>pop.example.org</Server>
        <Port>995</Port>
        <SPA>off</SPA>
        <Encryption>Auto</Encryption>
        <SSL>on</SSL>
        <AuthRequired>on</AuthRequired>
        <DomainRequired>off</DomainRequired>
        <LoginName>demo_example_com</LoginName>
      </Protocol>
      <Protocol>
        <Type>SMTP</Type>
        <Server>smtp.example.org</Server>
        <Port>587</Port>
        <SPA>off</SPA>
        <Encryption>Auto</Encryption>
        <SSL>on</SSL>
        <AuthRequired>on</AuthRequired>
        <UsePOPAuth>on</UsePOPAuth>
        <SMTPLast>off</SMTPLast>
        <DomainRequired>off</DomainRequired>
        <LoginName>demo_example_com</LoginName>
      </Protocol>
    </Account>
  </Response>
</Autodiscover>

---
Testing Mobileconfig
Try https://autoconfig.example.org/email.mobileconfig?email=demo@example.com
(...)
Cool! Now, head over to your email client and do some live testing. If all works well, you should just be required to enter the email address and password, the rest should get auto detected. It works best on Thunderbird. Outlook may struggle with it, depending on your Outlook version.